
We develop the VISTEMA®-Board to make your systemic work even more intuitive and effective. Here you will find all the latest innovations, improvements and practical tips on new features at a glance. Stay up to date and get the most out of your consultations!
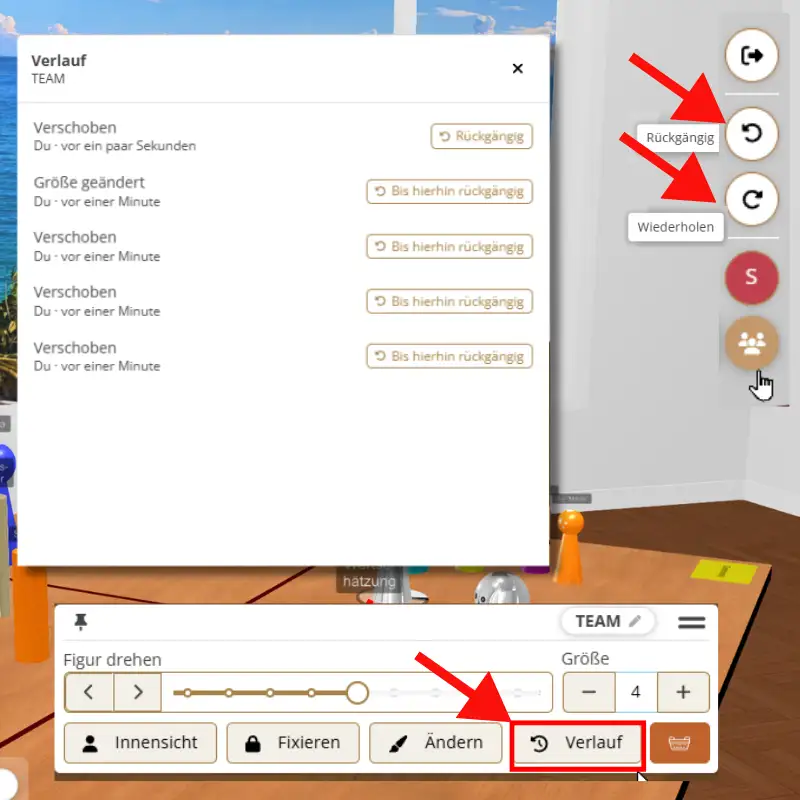
We've been waiting for it for a long time, and now it's finally here: the undo feature. And of course, it comes with a complete history. per figure.
This is how it works:
We've already discovered a few things that this makes possible, and we're curious to see what ideas you come up with.
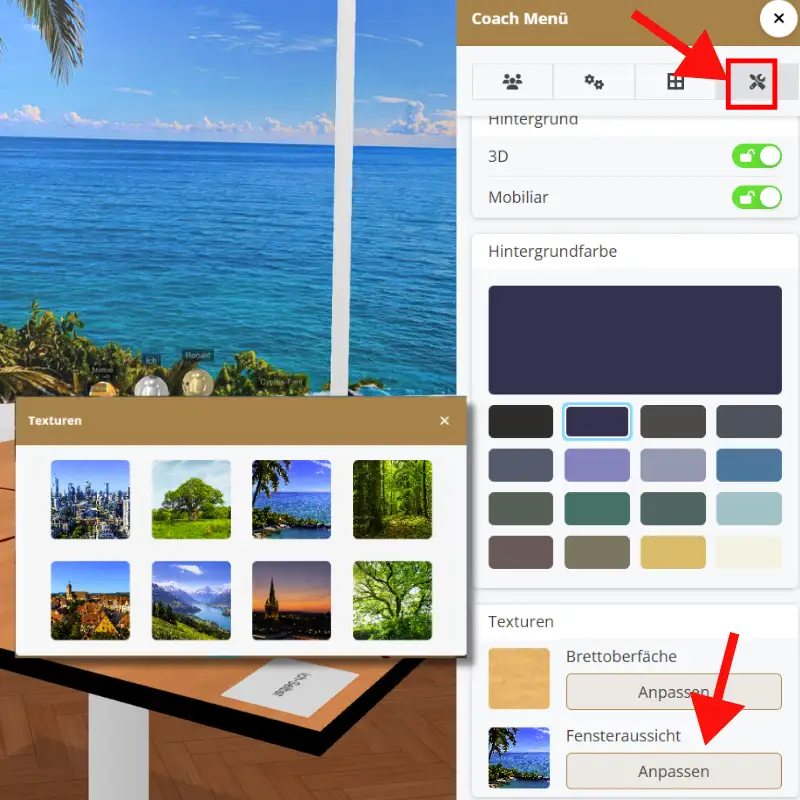
That beautiful tree outside the window has almost achieved cult status, and yet: sometimes a change of scenery is nice. That’s why you can now choose a different view from your window.
This is how it works:
This gives you another way to change the atmosphere in the room. Off to the beach, the forest, the mountains—or would you rather head to the city? It’s up to you.
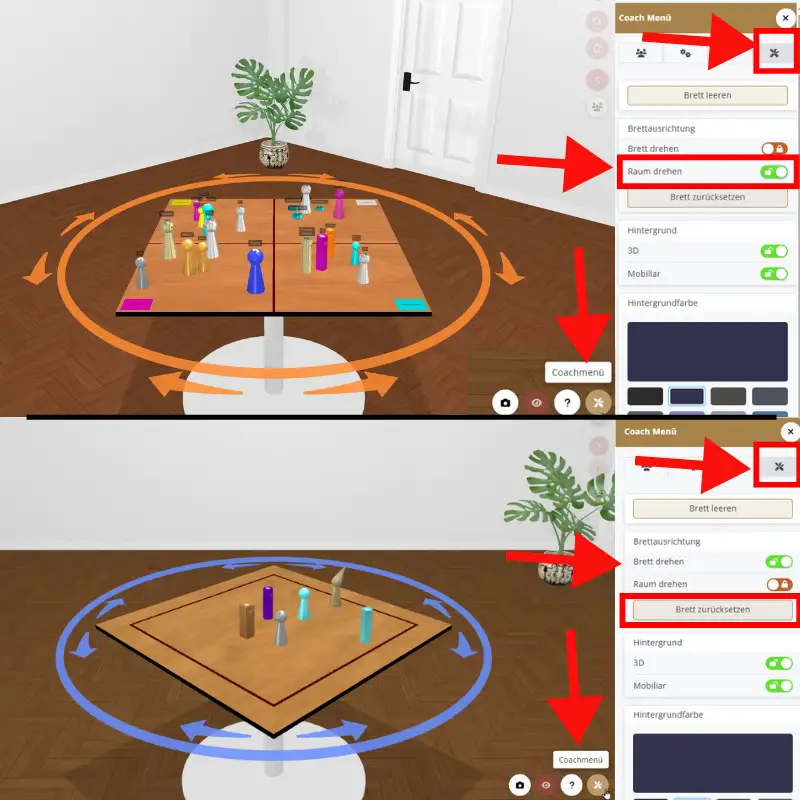
Clicking the „Center Board“ button or pressing the „C“ key returns the board to its default position. We all know that already. But sometimes, a completely different perspective on the board is exactly what a session needs.
For example, you can now change the board's orientation if the pieces were initially placed in an unfavorable position, or ensure that your client can always look out the window from the starting position.
Sometimes, for technical reasons, screen sharing isn't possible for your clients. We now have a simple solution for that, too.
This is how it works:
We hope you enjoy this little extra feature.
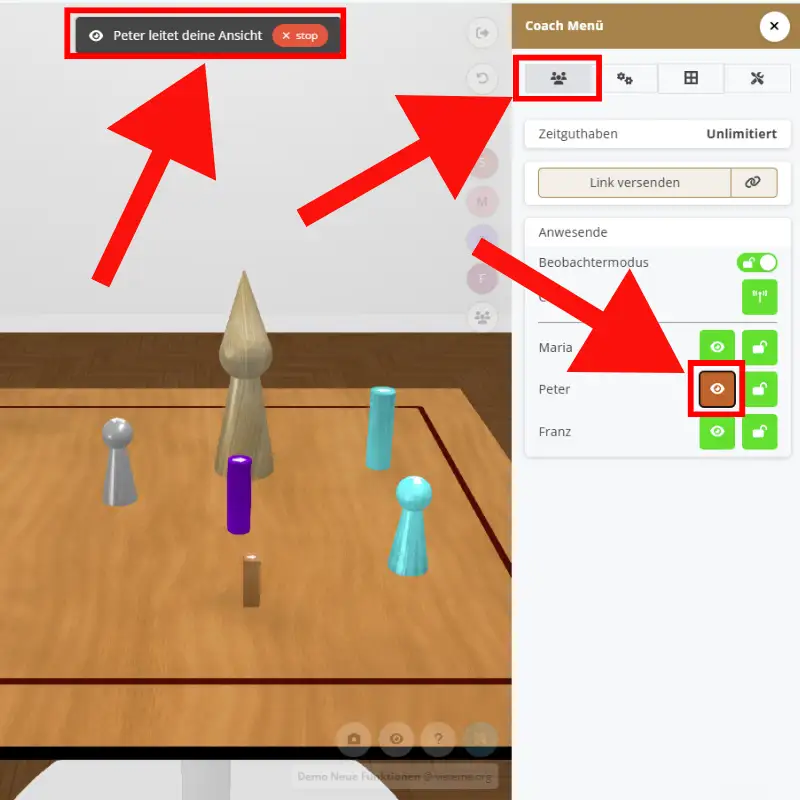
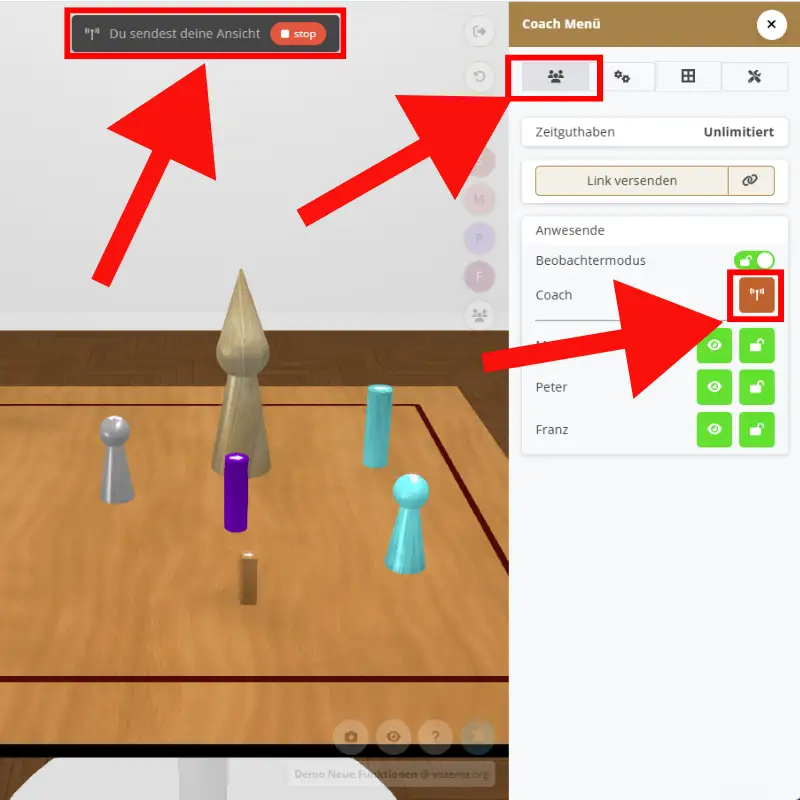
If you want to show your participants on the board what you've noticed or what you find noteworthy, you can now do so even more easily.
This is how it works:
Now, without having to go through the hassle of sharing your screen, you can point out specific details on the board at any time and easily let all participants experience them online.
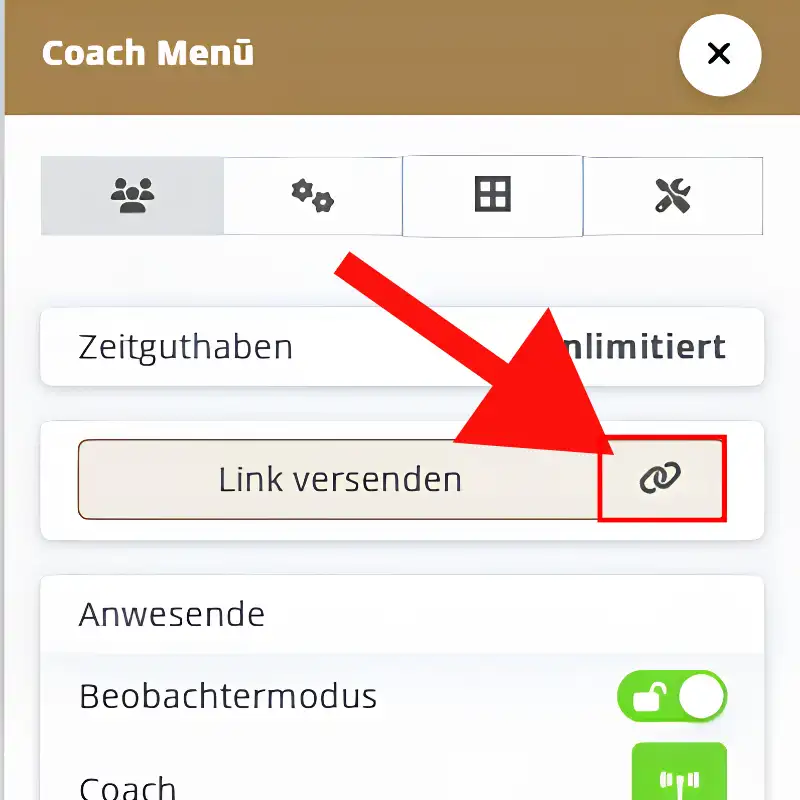
And here's another small improvement:
Until now, you had to click twice to copy the board link directly from the board in the Coach menu.
With the new icon, you can now do this directly, while still being able to send the link via email, WhatsApp, or similar platforms as before, if needed.
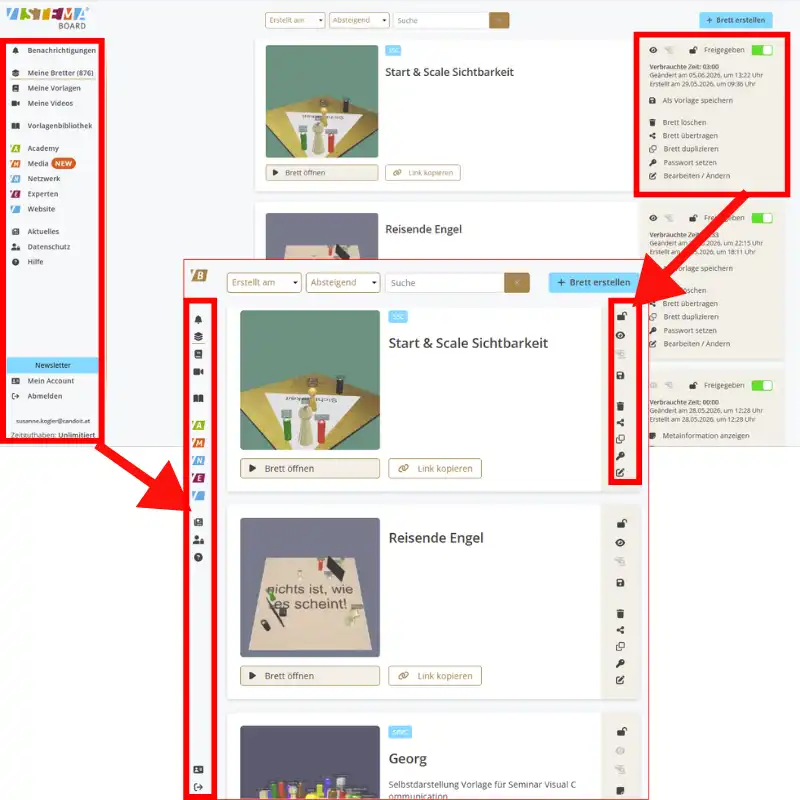
Not only on the dashboard, but also on the instrument panel, things are now clearer and more organized.
This is how it works:
This keeps everything neat and organized, while still giving you access to all the important features at any time.
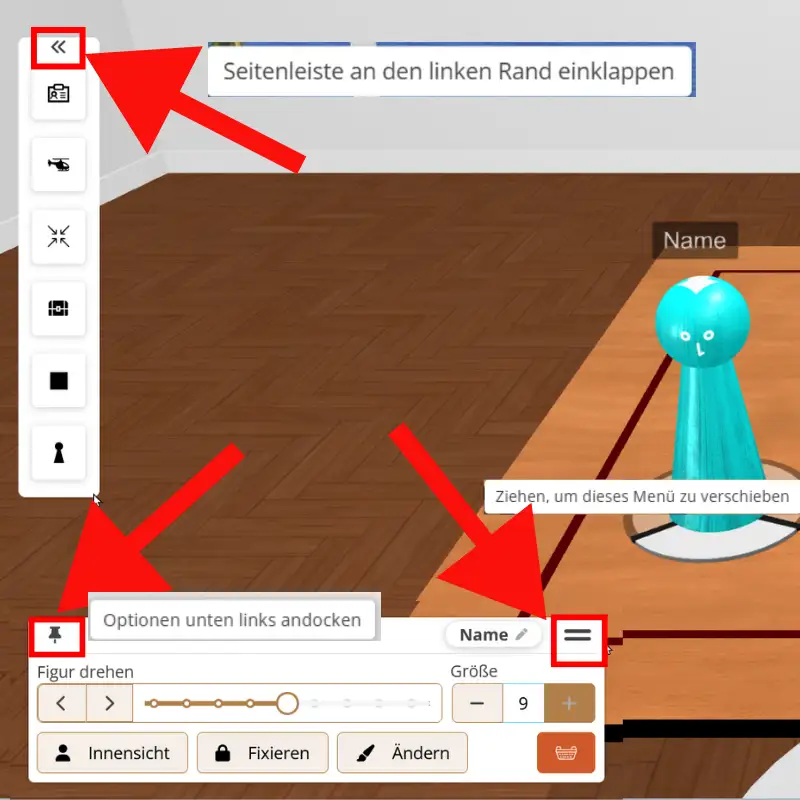
From now on, you can hide both the icons on the left-hand side and the action menu in between so that you have more space to work.
This is how it works:
We hope this makes working on smaller screens even more comfortable for you!
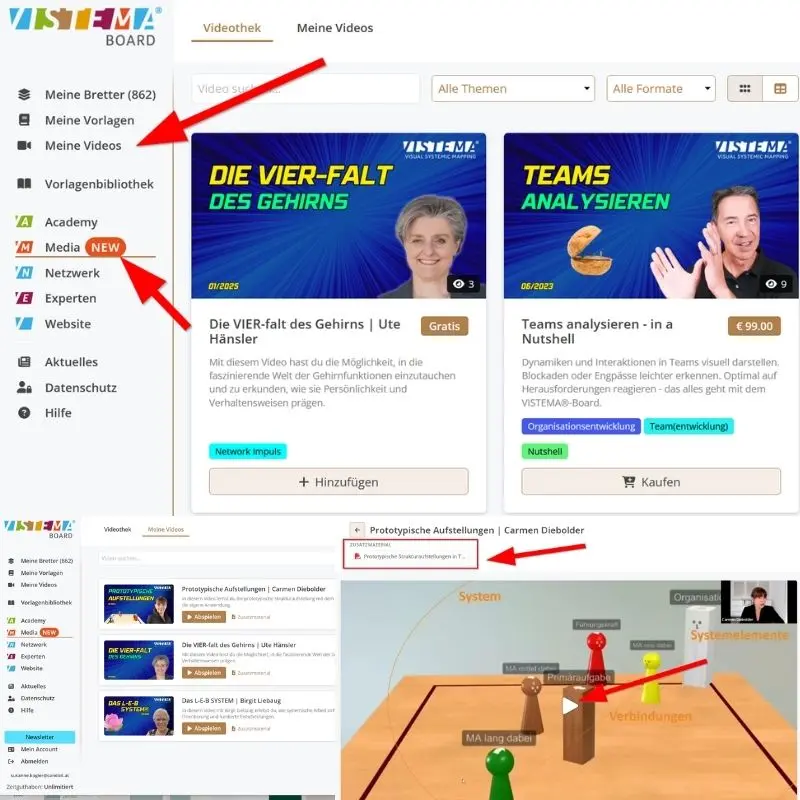
You can now find all instructional and information videos under the menu item ‚Media‚ in your dashboard.
All videos that you have already purchased or unlocked are available under the new menu item ‚My videos‘ collected.
This means you no longer have to search for a long time, but have your personal video content in one central location. You can return to it at any time, repeat content or watch individual sequences again if you need them for your work.
This is how it works:
For most videos there is also additional material to download - this makes the offer even more valuable!
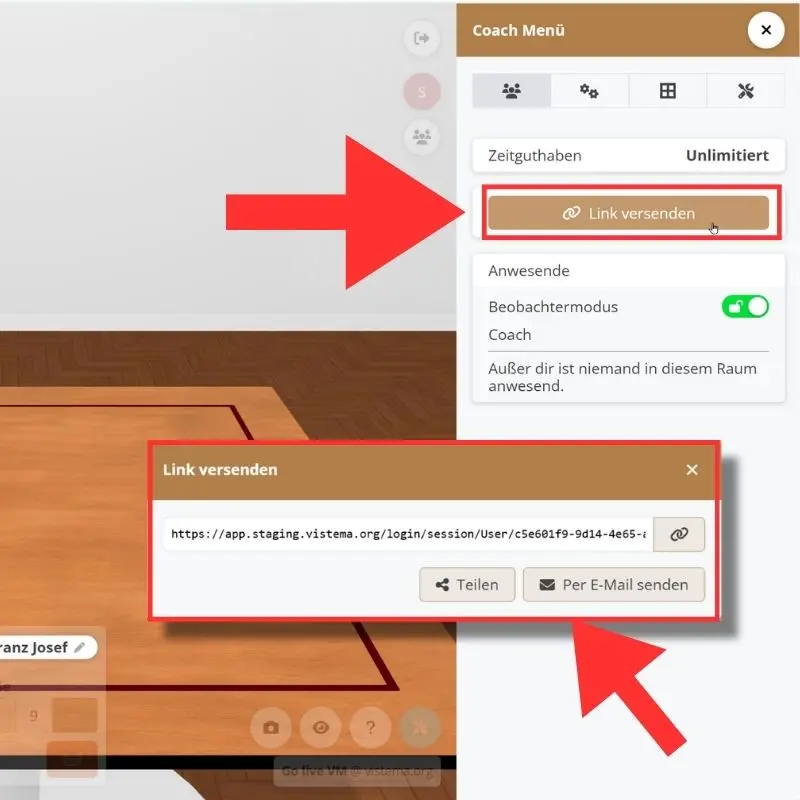
To make it even easier for you to share the board link, we have implemented a practical extension for you:
If you haven't copied the link in the dashboard, you can now find it directly on the board - in the coach menu, right next to the participants.
The following options are available to you there:
This means you always have access to the board to hand and can pass on the link quickly and easily.
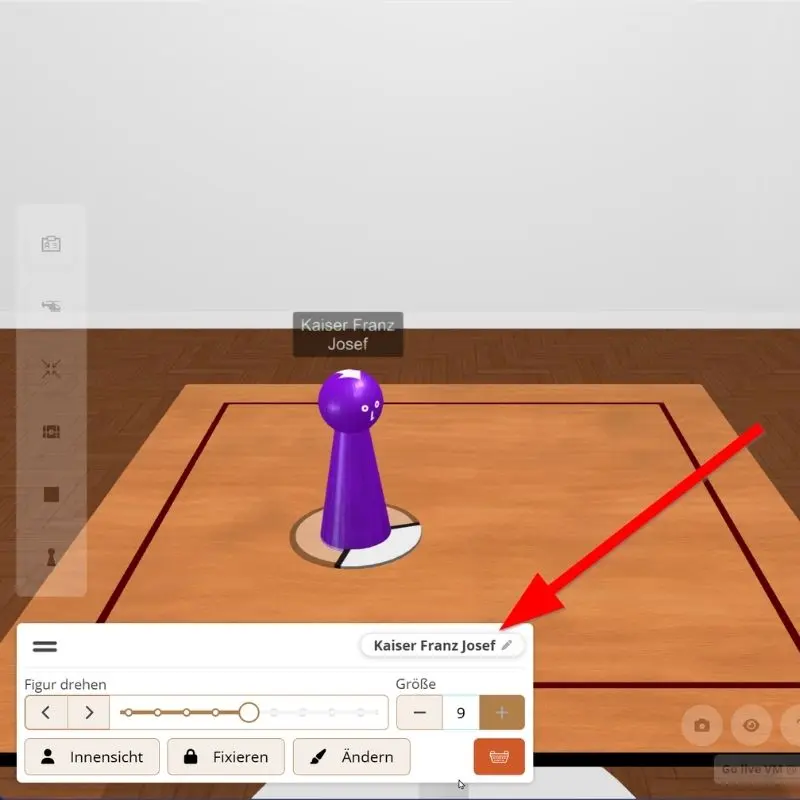
The name of the currently selected element can now be found at the bottom right of the action menu - instead of in the middle of the screen as before.
This creates more space on the board and ensures fewer distractions.
At the same time, orientation is maintained at all times: Even if a nameplate is too small because the element is perhaps further away or particularly small, you can always reliably recognize the name of the element.
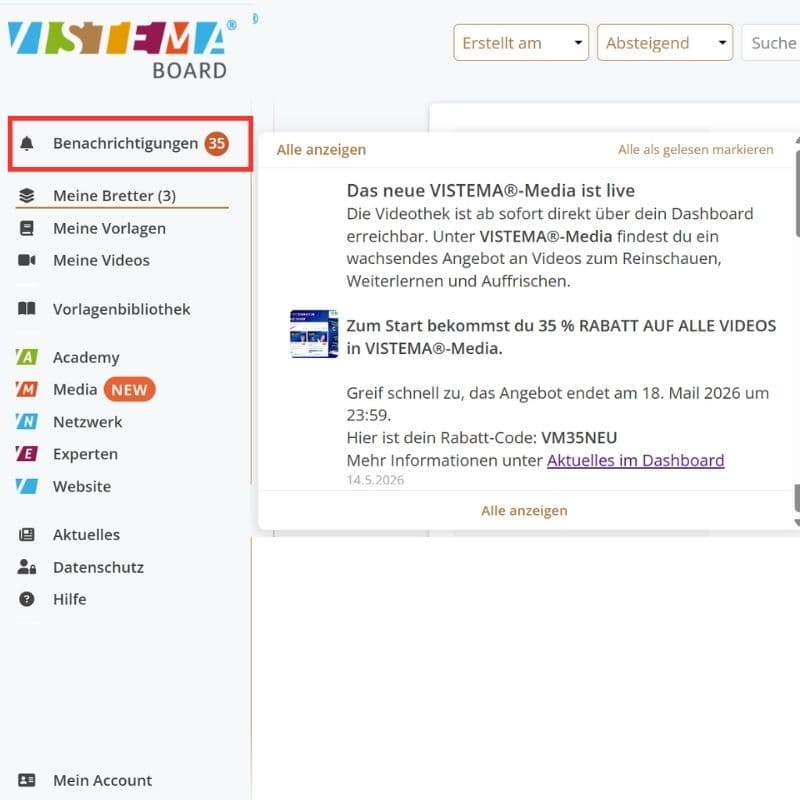
You will find your current notifications at the top left of the dashboard.
Instead of annoying pop-ups, everything that is new is clearly displayed in one place as soon as there is something interesting or particularly important. You can also see directly how many news items are still unread.
You will receive notifications when ...
This way you can keep up to date at all times and read and re-read everything at your own pace.
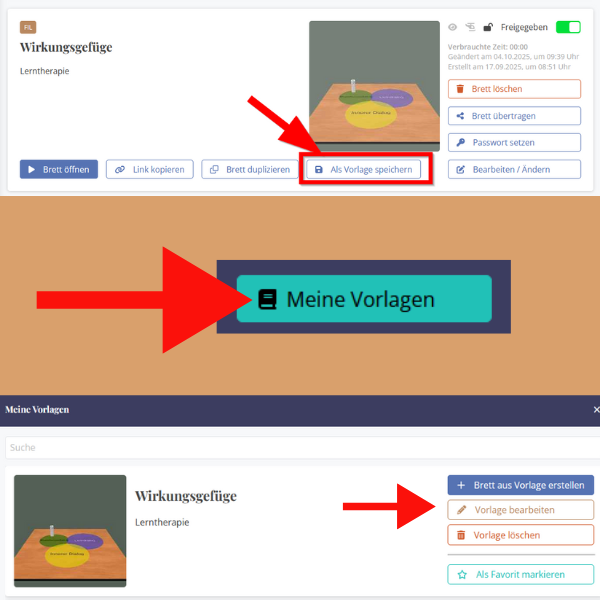
From now on you can also create your own Save template boards under ‚My templates‘:
This is how it works:
Of course, you can also delete or edit your own templates at any time.
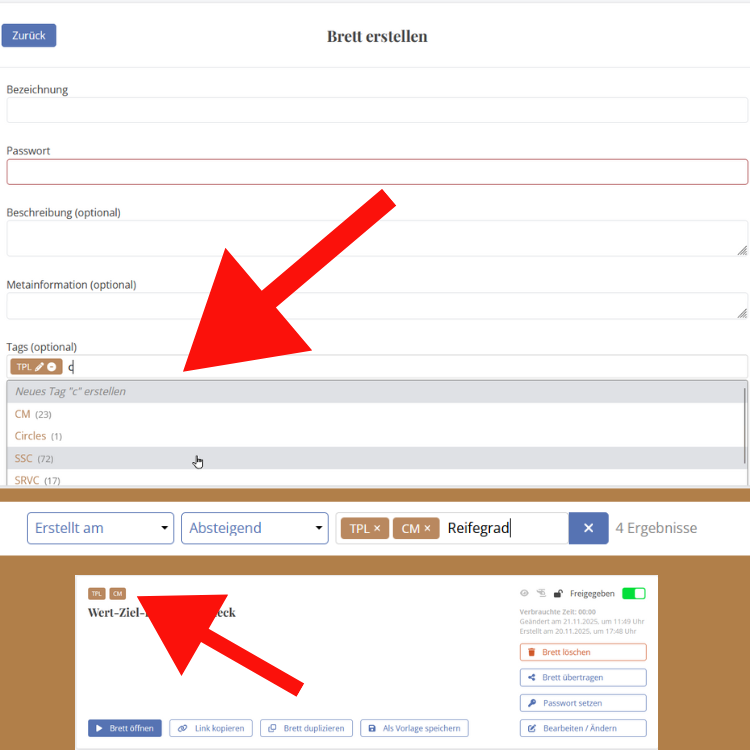
Your index has become a tag field and now functions as a real keyword with which you can sort your boards into different categories, for example. You can create folders (e.g. for all boards of a client) and sort a board into several folders at the same time.
That's exactly how it works:
This makes keeping things tidy even easier and searching even more convenient!
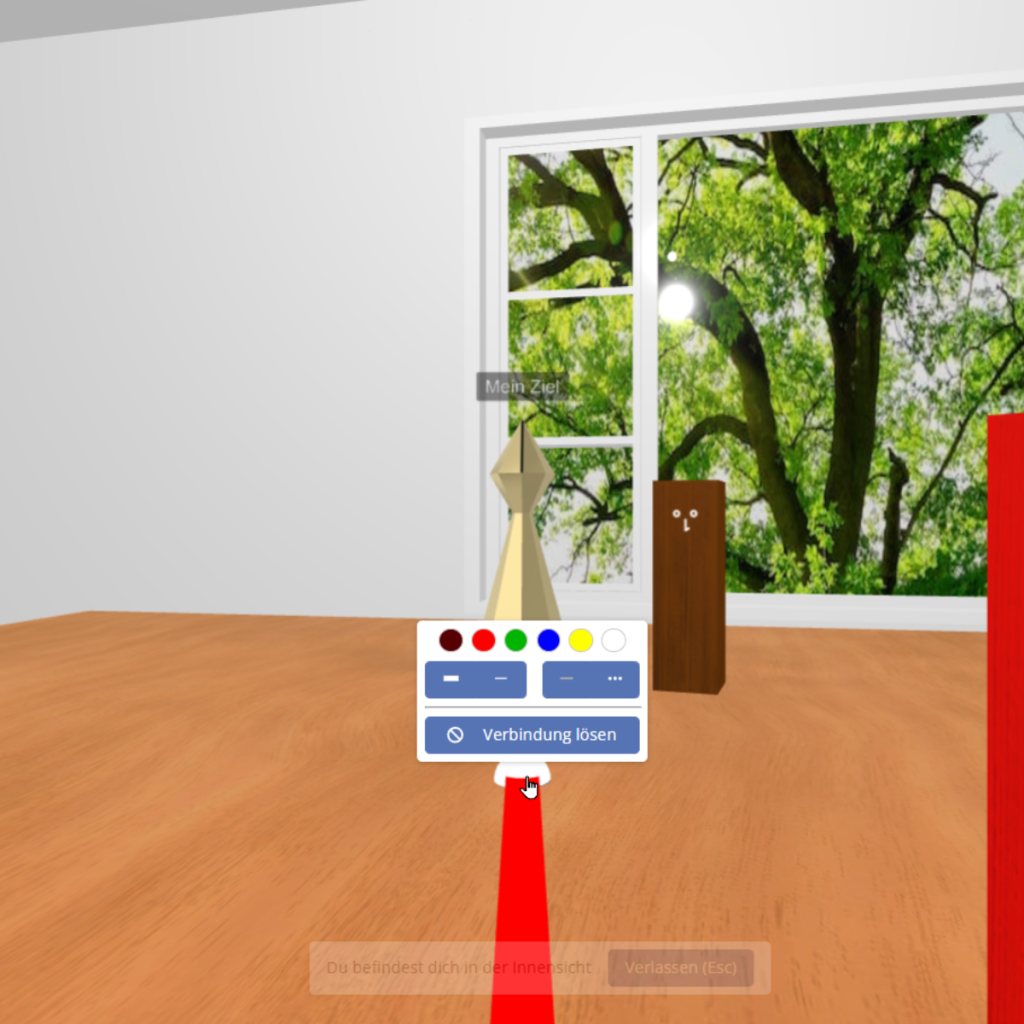
From now on, not only coaches, but also clients themselves can create connecting lines between elements.
What connects? Who is related to whom?
Which connection do you want to strengthen, loosen or redesign?
Especially in the process, it can make a decisive difference if your clients are actively involved - intuitively, directly and at their own pace. That's why they can now also create - and of course change - the connection line themselves.
And because it is often overlooked:
Connecting lines can also be edited from the inside view!
Simply right-click on the dot in the middle of the line!
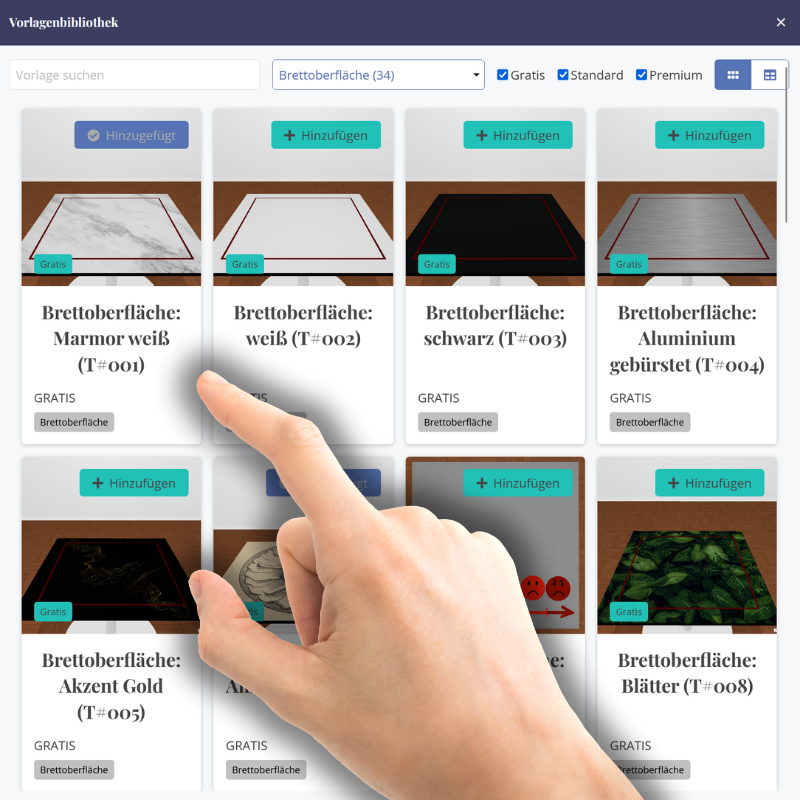
From now on you can easily switch between all your board surfaces during the current session!
Simply go to your Coach menu as usual, select the ‚Board settings‘ tab and you can choose between all your board surfaces. The only important thing is that you have previously retrieved the desired surfaces from the template library in ‚My templates‘.
With more than 40 options already available, it will otherwise quickly become confusing - and this is a good way to keep track of things
In any case, if you need or want something that doesn't currently exist: Just let us know - we'd love to hear your ideas!
Your personal template library in the online system board
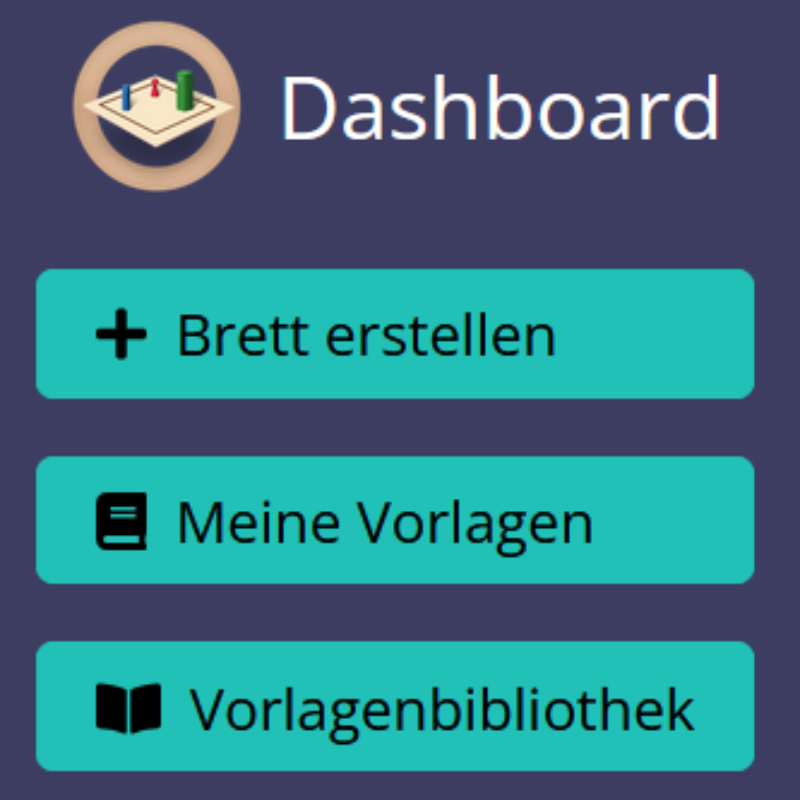
You will now find a new function in the dashboard:
the Template library - a growing pool that supports your work as a coach.
You can find the following here:
Effective board templates
Meaningful, helpful method descriptions
Variety of board surfaces
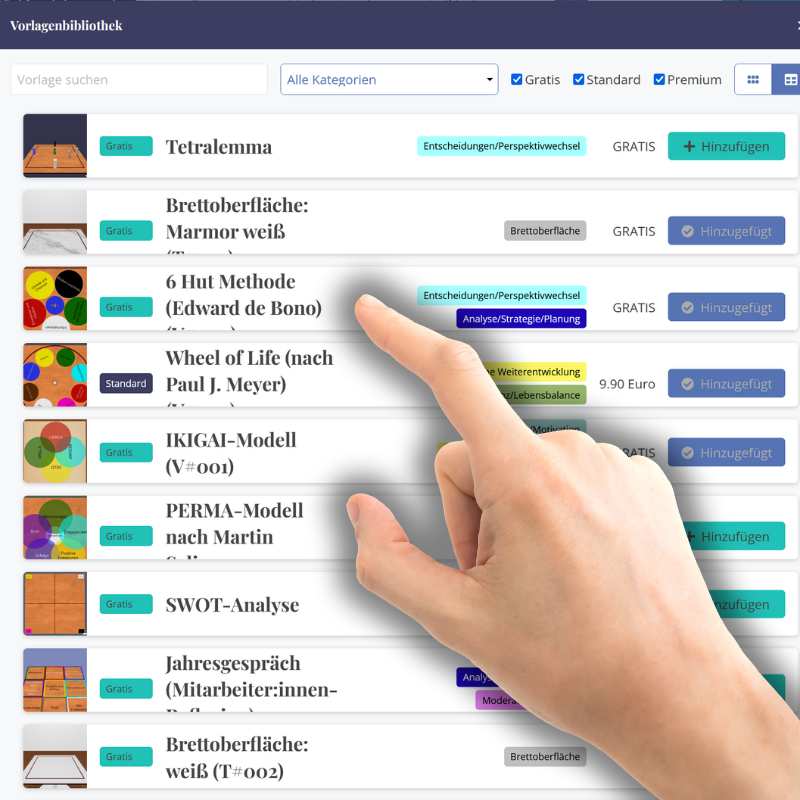
Here you will find ready-to-use board templates that will make your coaching even more professional:
No long preparation
No more accidental ‚destruction‘ of templates
This is how it works:
Browse through the template library and select the desired coaching method
Add them to your account
You will then find them under „My templates“ and can use it from there at any time with ‚Create board from template‘!
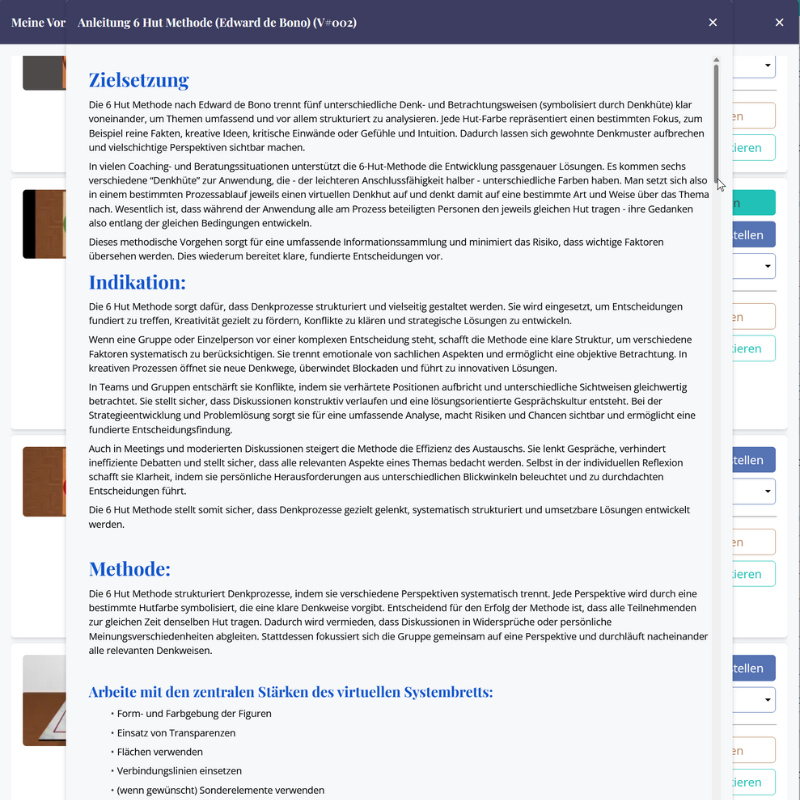
Detailed, helpful descriptions and collections of questions:
For each board template you will find:
Objectives and areas of application
Precise procedures and instructions
Helpful questions you can ask.
New and proven coaching methods can be used very quickly - and an ingenious knowledge database!
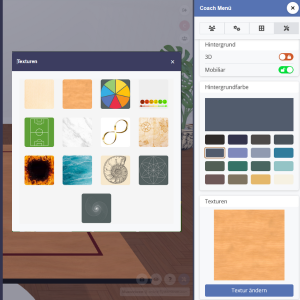
Choose from a variety of graphical interfaces that you can use flexibly for your own concerns, coaching and consulting settings.
Whether a different look, graphic design or topic-specific fields - each interface opens up new possibilities for you to visualize connections and make change intuitive.
This is how it works:
Browse through the template library and choose your favorite surfaces
Add them to your account
You will then find them under „My templates“ and can use them as a basis for new boards at any time
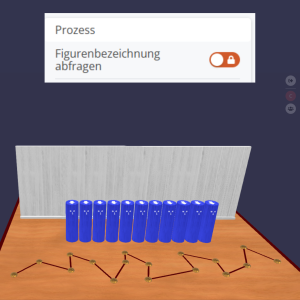
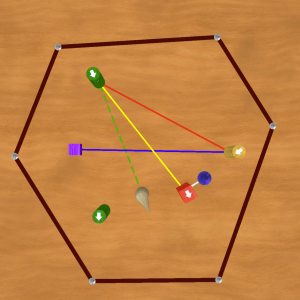
Simply hold the ALT key pressed and press D, to duplicate a piece directly. This allows you to quickly create lots of elements on the board! For example, to position lines freely on the board using the glass muggle pieces.
Expert tipIf you switch off the „Query figure name“ function in the „Control process“ tab in the Coach menu, it will be even faster!
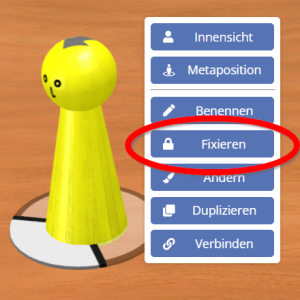
We have changed the term „locking“ to „fixing“ because it simply makes more sense! The element is „glued“ to its position. However, you can still change the color, shape and appearance.
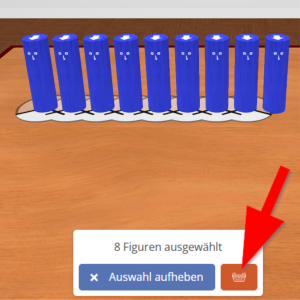
Select several figures by pressing the ALT key and select them with the mouse - and then delete them together. Of course, fixed figures are retained.
The online system board is becoming even more versatile: you can now Figures with connecting lines link!
This function opens up completely new possibilities for visualizing relationships, structures and dynamics. And best of all: with the help of Little helpers as anchor points you can Draw lines freely across the board and thus design your visualizations individually.
Relationships and connections not only become visible, but also dynamic and intuitively comprehensible.
Try it out and discover how this function takes your work with the online system board to a new level!
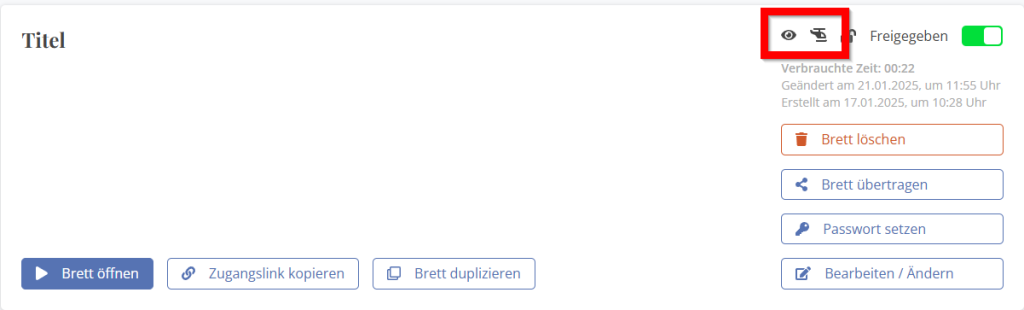
The dashboard is now even more informative! From now on you can see at a glance:
This feature makes it easier to monitor the status of your boards and ensure that everything is set exactly as you need it - whether you're preparing a session or working live.
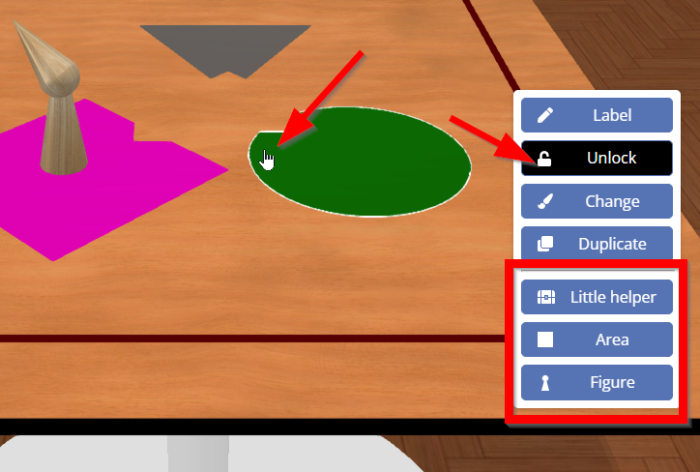
From now on you can create an area in the online system board. Alignment similar to the ground anchors in classical constellation work.
Although surfaces have no interior view, their ability to be aligned opens up exciting new ways of making dynamics and interactions visible.
We're already excited to see what creative uses this new feature develops into - let us know how you use it!

From now on you can use the Display language of the online system board individually! Previously, the language was automatically linked to your browser settings (German, Spanish and English). Newly added is now French! You can now easily select the language in which your dashboard and your board display are shown.
ATTENTION: The language in which the board is displayed to your clients still comes from the display language of your clients' browsers. It is therefore possible that you have the board displayed in English, but your two clients who are working on the board with you have their boards displayed in French and German.
You can also set the language for the newsletter so that you always receive the information that suits you - in the language of your choice.
This new feature makes working with the online system board even more convenient and personal. We look forward to making your work easier!
We have made working with templates even more convenient! From now on you can Create figures directly on blocked areas.
Previously, it was not possible to create an element directly at a specific point on a surface with a right-click - this sometimes disrupted the flow when working with templates. Now it's very simple: Block the area, and you can place figures or other elements exactly where you need them by clicking on them with the right mouse button.
This new feature provides more flexibility and makes working with complex templates or many surfaces in general even more intuitive.
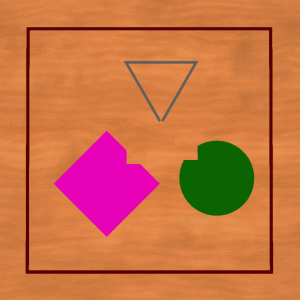
Each of the available areas can now be switched with a simple click so that only the outer frame of the area is displayed. This means that moveable triangles, rectangles, squares and circles can now also be displayed as frames and without filling. This opens up even more options for designing the board - and even more possibilities for working with areas and lines with the client.
If you click on an element, the action menu is displayed in the bottom left-hand corner of the window, with which you can set a number of things relating to the element. For example, the size of the element.
But sometimes the action menu gets in the way - it blocks a good view of the board or gets in the way when selecting elements. That's why we've given this menu an update: from now on, it can be moved to any other position. Simply click on the two small lines at the top of the action menu and move the menu by holding down the mouse button.
The helpful partitions in the ‚Little helpers‘ category are now also available in brown and black - for even more versatile applications!
We have changed some of the colors so that the direction arrows are easy to read on all figures. This means that the direction of the gold and silver metal colors is now clearly visible at all times.
The „Lock elements“ function ensures that elements cannot be changed. This is helpful for layout formats or if particularly important elements or areas are to be fixed in position.
A new feature is that elements that have been locked can no longer be deleted before they have been unlocked.
A little tip: The ‚Clear board‘ function still works as usual, of course, so that when the function is called, you are asked whether only unlocked elements or really all elements should be removed from the board.
When creating areas via the menu, they are now placed next to each other instead of all on top of each other in the middle of the board as before. This avoids confusion as to where the new area you have just created is...
The ‚Account‘ item in the dashboard has been optimized so that the required information is even clearer for you and you can carry out the desired processes even more easily. We would love to hear your feedback!
In the „Control process“ tab in the Coach menu, you will now find a new, very powerful function: Hidden mode.
If you activate it, only the FIRST character of the figure and area designations will be displayed. This is a great way to prepare and carry out a hidden set-up: For example, name the figures „A focus“, „B target“, „C obstacle“ and so on. If you now activate the hidden mode, only „A“, „B“ and „C“ will be displayed.
At the end of the line-up (or at a suitable time), simply switch off the hidden mode to clear the list - and all names will be displayed in full again.
Of course, you cannot rename figures/areas during the hidden mode - but you can create additional new figures/areas at any time.
Eye contact is extremely important when working with the board - and even small deviations from direct eye contact between pieces are often significant.
There is now a valuable aid to help you align figures even more precisely and easily! If you are in the inside view of a figure and rotate the figure with the RIGHT mouse button, a subtle line now appears in the center of the screen. If you position this line exactly in the center of the opposite figure, you will see this figure exactly.
Try it out right away!
Another fantastic new feature: From now on, when you are in the inside view of a character, you can change the size of your OWN character directly - without having to leave the inside view. How? Quite simply - via the menu in the bottom left-hand corner of the screen!
We have now made a significant change to the turning of figures. Time and again, clients and newcomers had difficulties aligning the figures with the angle indicator. That's why we have optimized the rotation again: All elements can now be rotated by moving the viewpoint indicator ‚around‘ the figure - instead of rotating it in a straight left/right line by holding down the mouse button as before.
This may take some getting used to if you already know it differently - but your clients will find it much easier.
Tell us what you think!
To make it even easier to rotate figures, we have adapted the design of the viewpoint indicator. You now ALWAYS have a ring around the entire figure that you can use to rotate it.
This way you can also turn a figure well if this figure „turns its back“ on you.
Transparent figures offer a multitude of new possibilities and are now used soooo much more often than the classic colored areas. We have therefore decided to make the surfaces transparent automatically when they are created. And of course you can change the surface back to non-transparent at any time.
In addition, areas are now created in size 4 by default - just like the figures. As you know, you can change the default size of areas, figures and elements in the coach menu!
In addition, areas are now created in the center of the board when creating using the „Areas“ button or the A (Area) button.
The slider for rotating figures, surfaces and elements has now ‚grown‘ a little so that you can also use it well on a smaller screen.
If you want to send a board to other online system board users, there are also three improvements here:
Sometimes so many pieces have to fit on the board that it gets quite cramped. It would be practical if you didn't have to reduce the size of each piece first.
And sometimes you simply need a lot of surfaces or little helpers in a very specific size.
To simplify the processes here as much as possible, you can now easily set the size in which surfaces or figures are to be created via the coach menu in the „Control process“ tab.
And perhaps you also have other ideas about what you could ‚do‘ with this function. We would be happy to discuss your ideas with you!
You can now set any background color if you want (see „Secret function for any background color“). And quite often you simply don't want to bother with such details. So it's nice that we now offer you a few more standard colors for your background.
And if you can't find anything suitable: simply create a template board with your ‚favorite background color‘ and duplicate it whenever you need it!
The names we use for the elements on the board are important. That's why it was also important for us to revise the signs for the pieces and helpers as well as the labeling of the areas.
Now, with a few small adjustments, we have created a solution that ensures that the signs are better allocated even on very full boards and that the surfaces can be optimally labeled.
We weren't quite happy with the colors of some of the surfaces. Too little contrast with the board or with other colors limited their usefulness in some cases. So that you can now really use all the surface colors as you wish, we have readjusted the color tones for some colors. For an even more varied color palette and always the right color.
Let us know which functions you are still missing and what you still need!
Four days, one code, the entire video archive at a discount. Get it now and benefit in the long term.
Promotion valid 15.05.-18.05.2026 - enter code at checkout
